DIY Wooden Picture Ledge: A Simple and Stylish Way to Display Art
Tired of cluttered walls and leaning artwork? A DIY wooden picture ledge offers a stylish and functional solution. This project requires minimal tools and materials, making it perfect for beginners. You'll create a beautiful display piece while honing your DIY skills, and the satisfaction of showcasing your artwork on a handcrafted ledge is unparalleled. Let's transform your blank walls into vibrant galleries!
Gathering Your Supplies: A Quick Checklist
Before you start hammering and sawing, ensure you have all the necessary tools and materials. This project's beauty lies in its simplicity, so don't be intimidated by the list. You likely already have some of these items lying around your home. The key is to prepare everything beforehand to make the process smooth and efficient.

Essential Materials:
- Wooden board: Choose a length appropriate for your wall space and desired number of pictures. Pine or cedar work well for their affordability and attractive grain. Aim for a thickness of at least ¾ inch for stability.
- Wood stain or paint (optional): Enhance the look of your ledge with a stain to highlight the wood grain or paint it a color that complements your décor.
- Wood screws: Select screws that are appropriately sized for your wood and wall type. Check the screw length to ensure they're long enough to securely fasten into your wall studs.
- Wall anchors (if necessary): If you're not attaching the ledge directly to wall studs, use wall anchors rated for the weight of your pictures and the ledge itself.
- Measuring tape and pencil: Precise measurements are essential for a straight, level ledge.
- Level: Ensure your ledge hangs perfectly straight.
Essential Tools:
- Saw (hand saw or circular saw): Cut the wood to your desired length.
- Drill with appropriate drill bit: Pre-drill holes to prevent the wood from splitting when screwing it to the wall.
- Screwdriver: Drive in the screws securely.
- Sandpaper (optional): Smooth out any rough edges or splinters on the wood before staining or painting.
- Paintbrushes or rags (optional): Apply the stain or paint evenly.
Building Your Picture Ledge: A Step-by-Step Guide
Now for the fun part! Follow these steps carefully to create a sturdy and visually appealing picture ledge. Take your time and focus on accuracy for the best results. Remember to always prioritize safety when using tools.
Step 1: Measure and Cut
Carefully measure the desired length of your ledge and mark it on the wooden board using a pencil. Use a saw to cut the board to the precise length. Ensure the cut is clean and straight for a professional finish.
Step 2: Sand and Finish (Optional)
If desired, sand the edges of the board to smooth out any rough spots. Apply wood stain or paint according to the manufacturer's instructions. Allow ample drying time before proceeding.
Step 3: Mark and Pre-Drill Holes
Measure and mark the location of the screws on the back of the board. Using a drill, create pilot holes to prevent the wood from splitting when you insert the screws. This is a crucial step for a secure installation.
Step 4: Install the Ledge
Hold the ledge against the wall in your desired location, making sure it's level. Using a pencil, mark the screw hole locations on the wall. Drill pilot holes if necessary for the wall anchors before securing the ledge to the wall with screws.
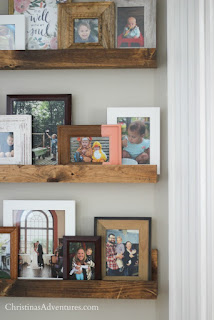
Displaying Your Art: Let the Creativity Flow!
Congratulations! You've successfully built your own wooden picture ledge. Now, the real fun begins: arranging your artwork and personal treasures. Don't be afraid to experiment with different arrangements and layouts. You can vary the sizes and styles of your pictures to create a dynamic and visually interesting display. This simple project adds a touch of personal style to any room while showcasing your cherished memories and artistic creations.
0 comments:
Post a Comment